!!! We have migrated this Cloud Instance to our own hosted Server instance !!!Please follow this link to get to the content you wanted: Thanks for your understanding. |
This guide describes how to complete the initial setup for SAML Single Sign On (SSO) for Confluence with Azure AD, applicable till plugin version 0.14.4. If you need any further support please feel free to contact us here.
Prerequisites
Confluence must be accessible via HTTPS
See https://confluence.atlassian.com/display/DOC/Running+Confluence+Over+SSL+or+HTTPS for instructions. This is necessary because Azure AD accepts only HTTPS-URLs for SAML endpoints.
Azure Active Directory Premium
If you already have an Azure AD account, but are not sure if your premium account is enabled
After signed in to your Azure AD account, click on Active Directory and choose the directory you want to use with SAML Single Sign On. After your chosen directory opened up, click on Licences on the right side. Then, under the Licence Plans you will see the licence type you have - Microsoft Azure Active Directory Premium, if it is enabled. Otherwise, see video provided above to enable it. 
|
If your Azure premium account is not yet enabled, find out how to enable Azure Active Directory Premium trial here. To improve the user experience of our plugin and reduce the costs of our customers from purchasing Azure Premium account, we already applied for being listed in Azure AD Application Gallery. Due to some internal reasons at Microsoft, this process is taking excessively long. If you are already a customer of Azure AD, your voice may help us speed up the process. Support us and request the plugin integration here: waadpartners@microsoft.com.
Installation Procedure
Step 1: Install the plugin 
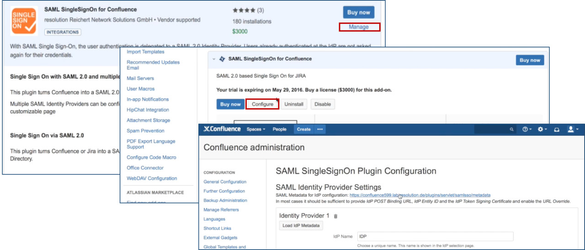
- Click Add-ons under Confluence Administration on the top right corner of your Confluence interface. Then, choose Find new add-ons and you will be taken to Atlassian Marketplace. Search for SAML SSO and click on Free Trial to install.

- After installation succeeded, click on Manage, then choose Configure. Now, you are on the plugin configuration page.

Back to Top
Step 2: Setup the Azure AD 
Step 2 will be completed in Azure AD.
Substep A : Select your directory and start application dialog
- Go to https://manage.windowsazure.com and login with your credentials.
- Select Active Directory on the left navigation panel, and select the directory that you want to use with SAML Single Sign On.

- Click on APPLICATIONS, then click on ADD to start a new application dialogue

Substep B: Add a new application
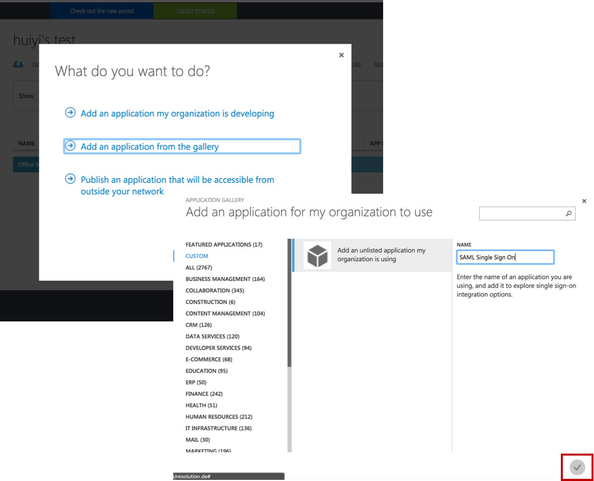
- Click on Add an application from the gallery.
- Select Custom on the left navigation panel, and click Add an unlisted application my organization is using.
- Then, fill in a name of your choice, e.g.. SAML Single Sign On in the NAME field.
- Click on the Finish button at the bottom to add the application to your directory.

Back to Top
Substep C: Configure the new application
- Click on Configure Single Sign On. In the Pop-up window choose select Microsoft Azure AD Single Sign-On, then click on Next.


- Click on Download Metadata (XML) to download the FederationMetadata.xml. We will configure the SAML Single Sign On with the Metadata from Azure AD in Step F.
- Check the Checkbox Confirm that you have configured... .
- Click on Next.

- Fill in a NOTIFICATION E-MAIL for which you want to get notifications for this application.
- Click Finish to complete the application configuration. Then you come back to the overview page of SAML Single Sign On and continue with Substep D to grant user access.

Substep D: Grant access to users
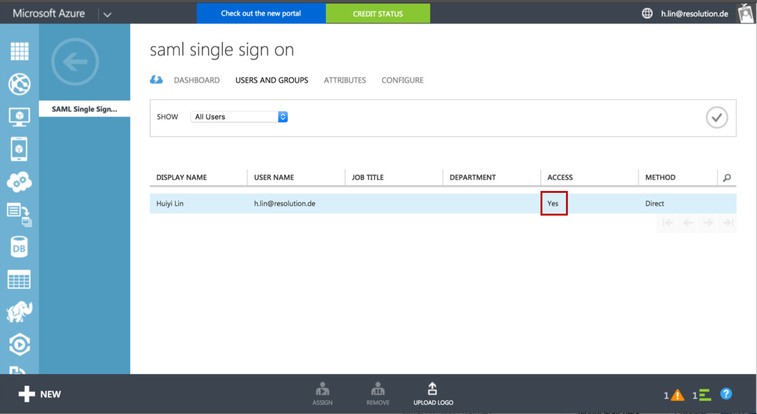
- Click on USERS AND GROUPS and select All Users in the SHOW drop down field. Then click on the tick on the right side to show all users.
- Select the user which you want to grant access for this application, and click on ASSIGN at the bottom.
- Then, click on YES at the bottom of the black pop-up window to confirm to enable access for selected users.

- Finally, review “Access” status to see if the user has been successfully granted access to application now.

Step 3: Configure the Plugin 
- To continue Step 3, please go back to the plugin configuration page opened in Step1.
Substep A: Load Azure AD Metadata
- The recommended way to setup the Azure AD on the SAML Single Sign On is to import the Azure AD Metadata .
- Click on Load IdP Metadata in the SAML Single Sign On configuration page.
- Select load from XML and paste in the content from the FederationMetadata.xml (downloaded in Step2 Substep C) into the field below.
- Click on Load to load the Azure AD configurations into the plugin.

Substep B: Configure general Confluence groups
If a user logs in using SAML, he will be added to the groups specified in the User Groups section. This applies to all users. The user is assigned to these groups in addition to the groups in the SAML-response's attribute. The standard group in Confluence is called "confluence-users".

- Click Save settings to store the configuration

Back to Top
Step 4: Test 
In a separate browser, open the URL https://<your-confluence>/plugins/servlet/samlsso.
You should be authenticated by your Azure AD and redirected to the Confluence Dashboard.
Step 5: Enable login redirection 
After testing, you can enable the login page redirection to finally activate the plugin. After checking the Enable SSO Redirect checkbox and clicking Save settings, requests to the Confluence login page should be redirected to the Azure AD.

If Enable SSO Redirect is enabled, you can login to Confluence manually by browsing https://<your-confluence>/login.action?nosso. Use this URL if you need to login a local user unknown to the Azure AD or if there are any issues with Single Sign On. |
Back to Top
Note: To provide a greater user experience, we are going to release newer version of the SAML plugins with improved user interface in end Nov/early Dec 2016. The associated documentation can be found here.


